
When it comes to dealing with Active Directory Domain Services, and it is crucial for network and directory administrator to:
- Understand directory services in depth
- Manage objects like users, computers, and groups efficiently
Microsoft has provided many tools to manage Active Directory Domain Services; these tools are also available for client Windows operating systems and are called Remote Server Administration Tools (RSAT).
Table Of Contents
-
Remote Server Administration Tools (RSAT)
-
Active Directory Users and Computers (ADUC) Console
-
How to Install ADUC on a Windows Member Server
-
How to Install ADUC on Windows Clients
-
ADUC Console Components
-
ADUC Advanced Settings
-
Protect Objects from Accidental Deletion
-
Create an OU
-
Create a User Object
-
Enable/Disable User Accounts
-
Create a Group Object
-
Change Group Type and Scope
-
Add Members to a Group
-
Create a Computer Account
-
Delete Users, Groups and OUs
-
Search Objects
-
Delegate Control to Users Using ADUC
-
Create and Save Queries
-
Other Options on the Context Menu
Remote Server Administration Tools (RSAT)
RSAT tools allows for the remote management of Windows servers (domain controllers or member Windows servers).
RSAT enables administrators to run snap-ins and tools to control features, roles, and role services on a remote server. The software comes with tools for managing the following:
- Group Policies
- Hyper-V
- Clusters
- Best Practices Analyzer
RSAT supports the following operating systems:
- Windows 7
- Windows 8
- Windows Server 2008
- Windows Server 2008 R2
- Windows Server 2012
- Windows Server 2016
- Windows Server 2019
Below are some common remote administration tools included in the RSAT package:
- Active Directory Certificate Services tools
- Active Directory Rights Management Services tools
- Active Directory Users and Computers
- Active Directory Administrative Center
- ADSI Editor tools
- Best Practice Analyzer tools
- DHCP Server tools
- DNS Server tools
- Hyper-V tools
- Network Load Balancing tools
- Server Manager for Windows Clients
- File Server Management tools
- Remote Desktop Services tools
- Windows Server Update Services tools
- Fax Server tools
- Remote Access Management tools
Active Directory Users and Computers (ADUC) Console
Active Directory Users and Computers is a Microsoft Management Console snap-in which is widely used by system administrators to create and manage Active Directory objects, such as users, computers, and groups. Following is a list of some common tasks that ADUC can handle:
- Create and manage Active Directory objects, such as groups, contacts, users, and computers along with their attributes.
- Create and manage organizational units, move users and computers in different OUs, and delete OUs.
- Delegate permissions to users and groups for Group Policy management.
- Deal with FSMO roles like Infrastructure master, RID master, and PDC Emulator.
- Raise the domain or forest functional level.
- Use advanced settings to manage the NTDS Quotas or LostAndFound container objects, System information, and Program Data container.
- Change passwords.
- Reset user accounts.
- Add and remove users to security and distribution groups.
- Add or remove the extra columns to see extended objects properties.

How to Install ADUC on a Windows Member Server
RSAT tools came bundled with the OS in Windows Server 2008 R2. Before that and even for some Windows clients, these tools are available as a package for download with installation instructions.
Windows server OS comes with Server Manager. This management tool provides an easy way to add server roles and additional features for the server you are working on. Server manager can manage remote computers too.
The following steps guide you to install ADUC using the Add Roles and Features wizard in Server Manager.
- Launch Server Manager in one of the following ways:
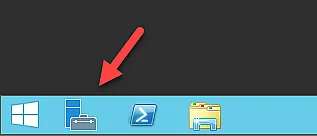
- Click the Server Manager icon on the taskbar, as shown below:
- Click the Windows Start button and type “Server Manager” in the search box. Then click the Server Manager icon.

- Click the Server Manager icon on the taskbar, as shown below:
- Click “Add roles and features” to open the wizard.

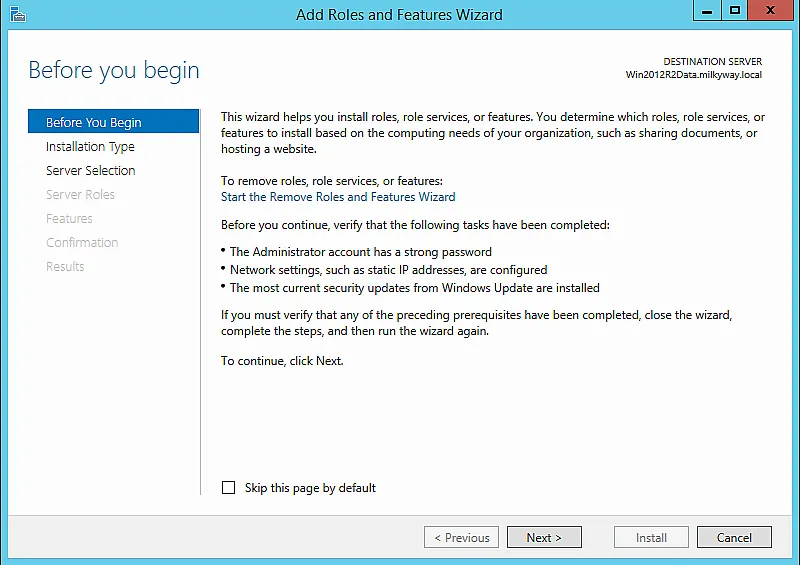
- The first page guides you on what you can do with this wizard and what are the prerequisites for installing these roles and features. Click Next to proceed.
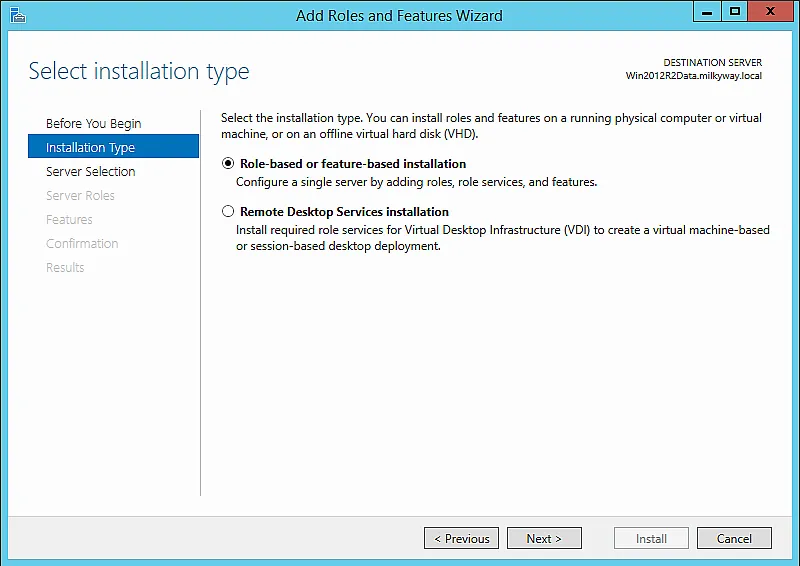
- On the next page, you need to select the type of installation. Select “Role-based or feature-based installation” and click Next.
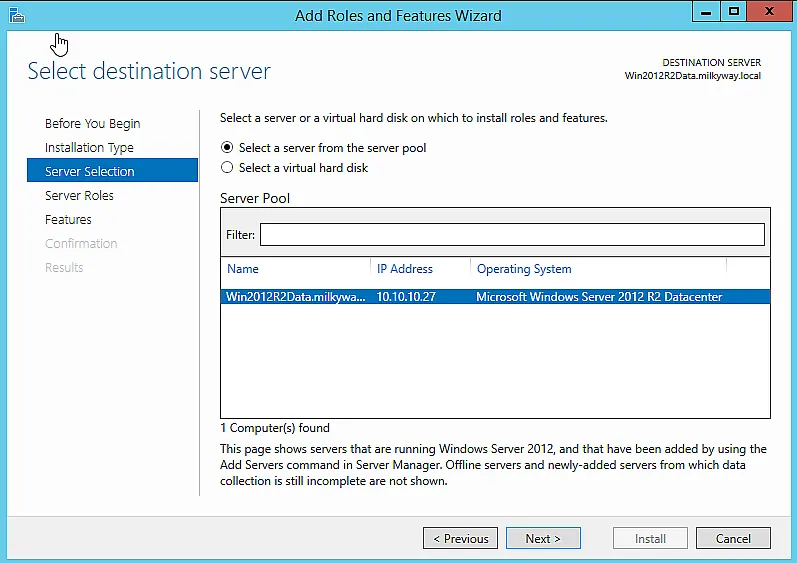
- Select a server from the server pool if you have other remote servers available, or a virtual hard disk option. Click Next.
- On the next page, you have all the available roles for selection. For the Remote management tools, skip this part and click Next.
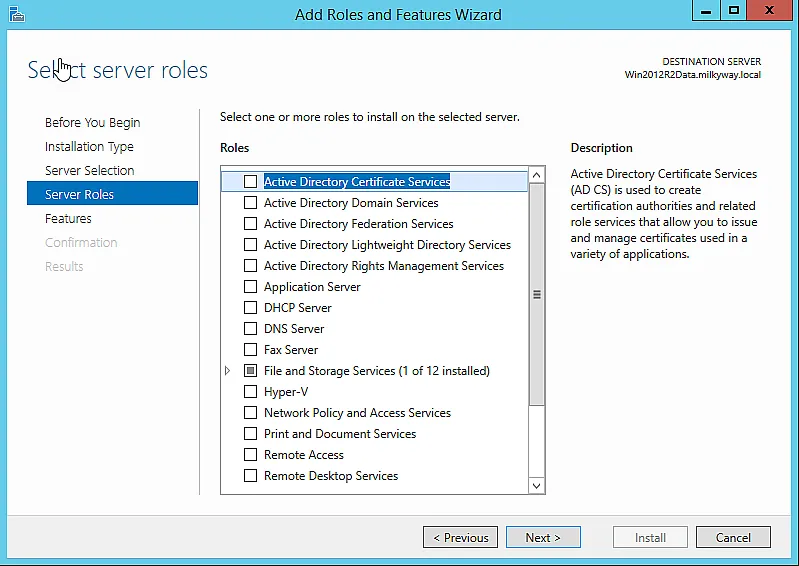
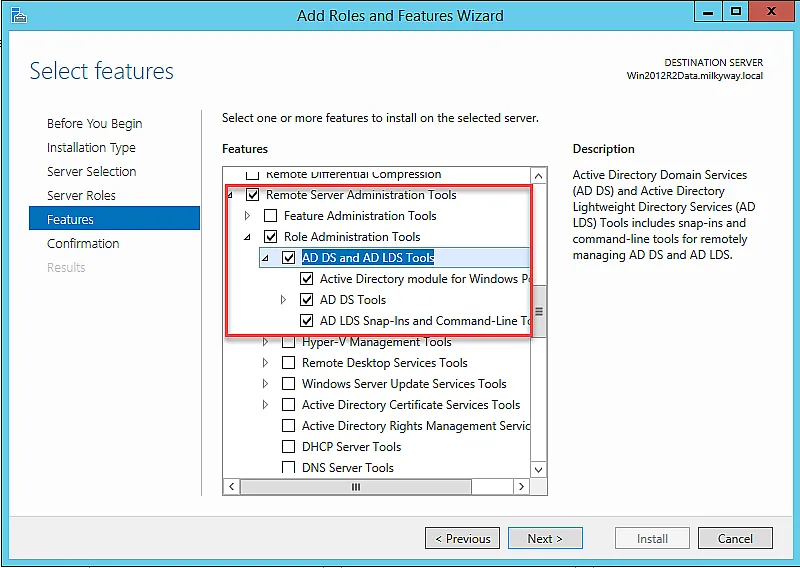
- On the next page, you can select the required features. We will select “Remote Server Administration Tools” and “AD DS and AD LDS Tools”, which will automatically select the other Active Directory management tools. Click Next.
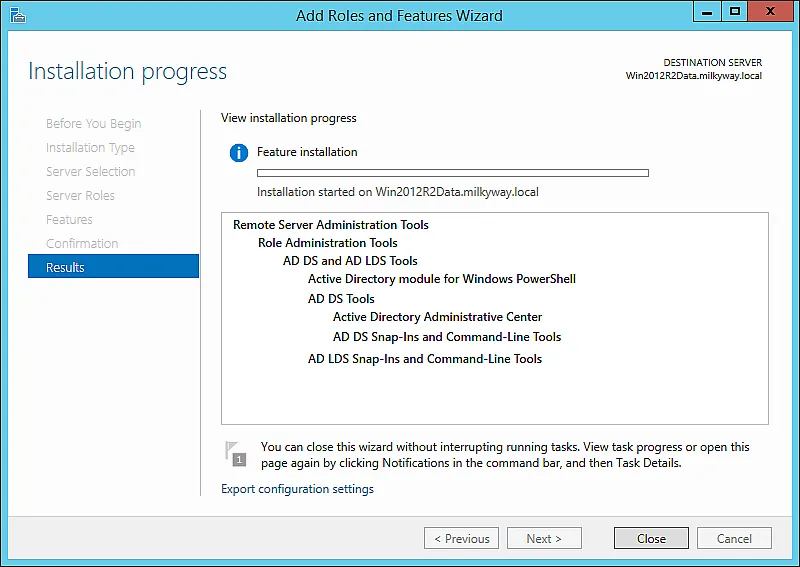
- The next page displays a summary of the tools being installed. Select the “Restart the destination server automatically if required” checkbox because some of the Roles and Features require server restart for the installation to take effect. Click Install to start the installation.

- On the next page, you can view the installation progress. The option to close the wizard is also available as the installation can be done as a running task. Click “Close” to close the wizard.
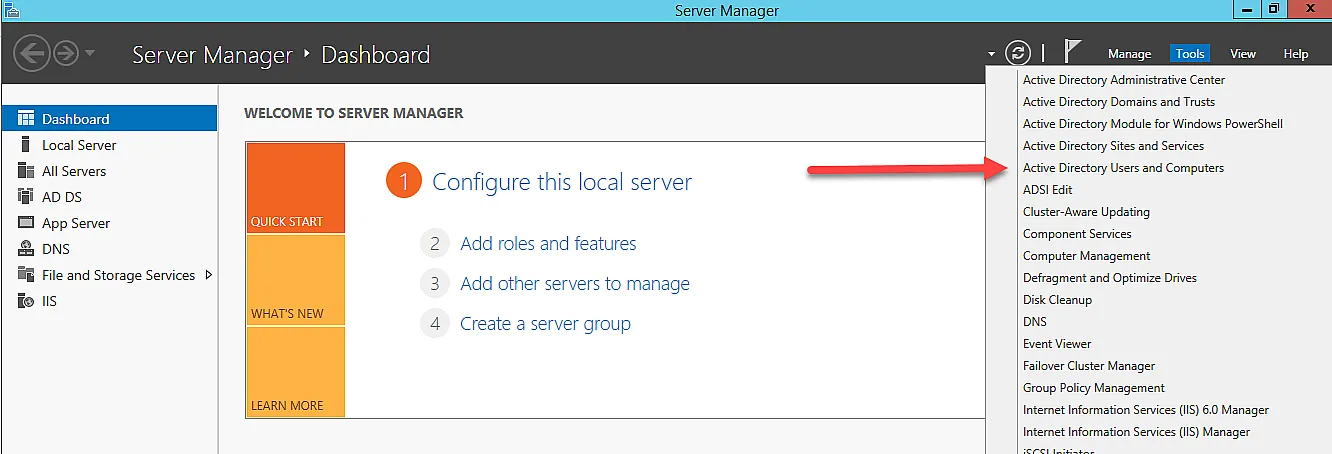
- After the installation succeeds, open Server Manager and click the Tools menu to see the installed tools. The following screenshot shows Active Directory Users and Computers along with other management tools.
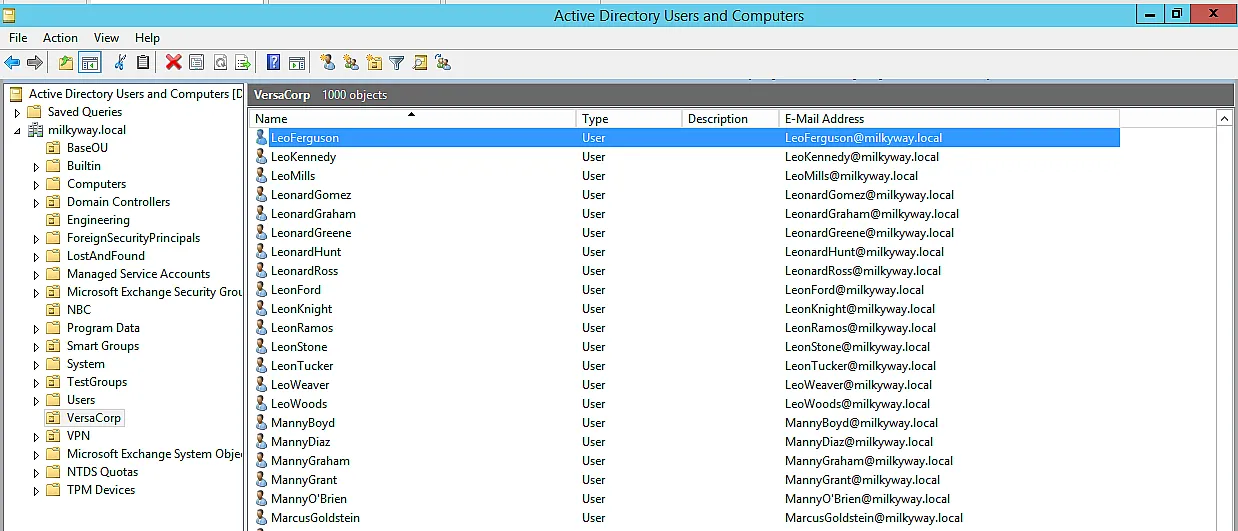
The following screenshot displays the Active Directory Users and Computers (ADUC) console:
How to Install ADUC on Windows Clients
Let’s go over the several ways you can to install Active Directory Users and Computers on your Windows 10/11 workstation now. Depending on the version of Windows 10, either access optional features can be accessed in Windows Settings to install the tools that are already included with Windows 10 (as of version 1809) or install an MSI file containing the RSAT tools.
Follow these instructions to install the tools if you’re using Windows 11 or a later version of Windows 10, such as version 1809, make sure you have access to the Internet to download the RSAT tools.
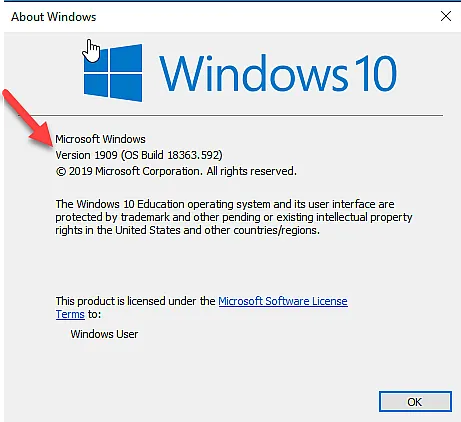
Determine your Windows Version:
You can determine the Windows version by following any of the steps below.
- Click Start > Settings > System > click About in the left navigation pane. It will show the edition, version, and OS build information, similar to the following:
- Right-click the Start menu and then click System. You’ll now see edition, version, and OS build information, similar to the following:

Install ADUC for Windows 10 Version 1809 and Above
- Click the Start menu; then click Settings > Apps
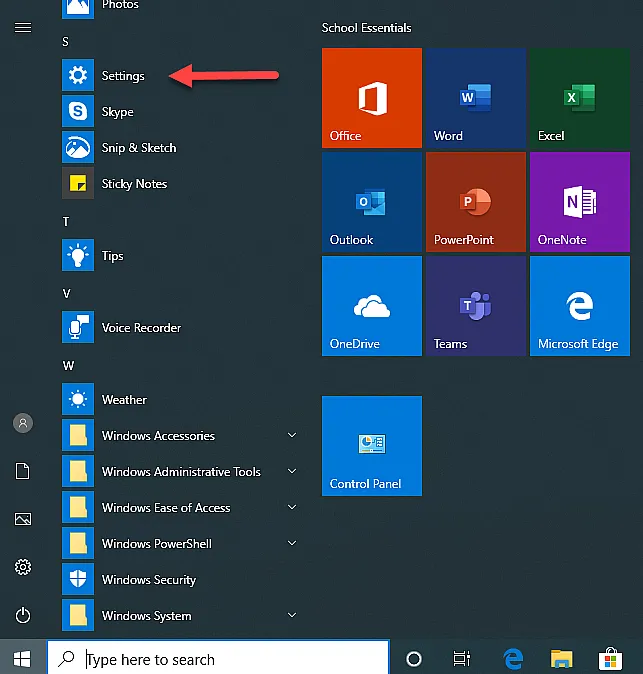

- Click Optional Features, and then click Add a feature.


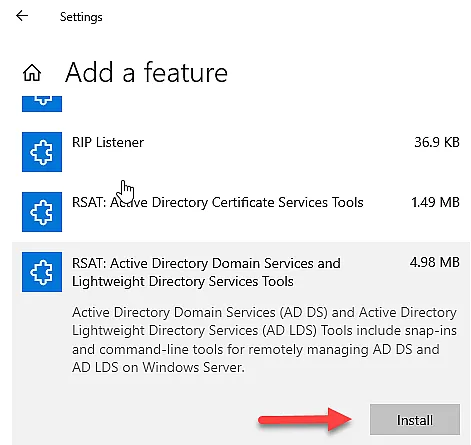
- Click “RSAT: Active Directory Domain Services and Lightweight Directory Services Tools”. (“How to Install Active Directory Users and Computers (ADUC) + RSAT tools …”)

- Click Install.
- When the installation completes, you will see a new item in the Start menu > Windows Administrative Tools.

Install ADUC for Windows 8 and Windows 10 Version 1803 and Below
- Download and install Remote Server Administrator Tools for Windows 10 version 1803 and below. Different versions RSAT tools are available on the Microsoft Download Center.


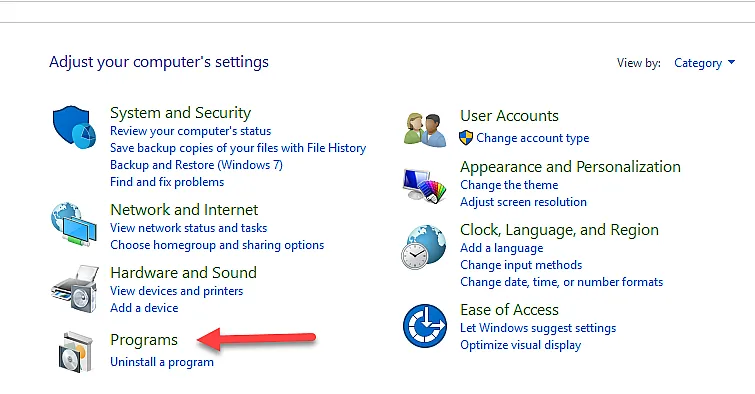
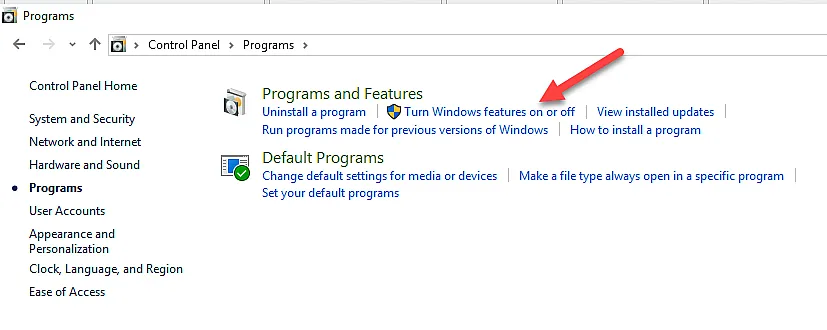
- Click the Windows Start button and then click Control Panel > Programs > Programs and Features > Turn Windows features on or off.
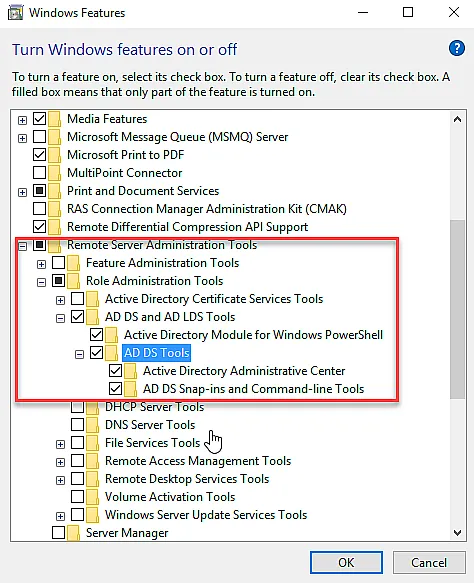
- Scroll down in the list of features and expand Remote Server Administration Tools.
- Expand Role Administration Tools.
- Expand AD DS and AD LDS Tools.
- Check AD DS Tools and then click OK.
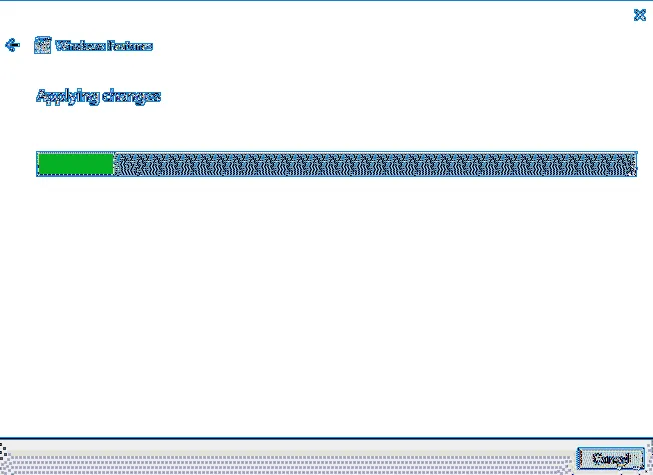
- The system will install the tools and will ask for restart.

- When the installation completes, you will have a folder, Windows Administrative Tools, in the Start menu. ADUC should be in this list.

ADUC Console Components
The Active Directory Users and Computers console has some key component that make it easy for system administrators to manage objects. These components are as follows:
- Menu Bar: Contains the File, Actions, View and Help menus, with lots of options to choose for the ADUC console.
- Toolbar: Contains buttons to perform quick actions, such as Create a new user, Create new group, Create a new OU, Show/hide Directory and Action panes, etc.
- Directory Pane or Console Tree Pane: Shows you the hierarchy of the domain you are connected with. Also shows the list of available containers and OUs.
- Middle Pane or Objects Pane: The most important pane that contains the objects and their list of attributes in the form of columns, such as Name, Type, Description, and Email. Some other attributes can also be added and removed as columns using the View menu.
- Actions Pane: Shows the details of the selected object and some actions when you click on More Actions.

ADUC Advanced Settings
ADUC by default shows a list of some of the OUs and containers, but there are some advanced settings that enable administrators to work on complex settings for the other containers and OUs, which are not visible in the console by default. To enable advanced features, click on the View menu, then click Advanced Features.
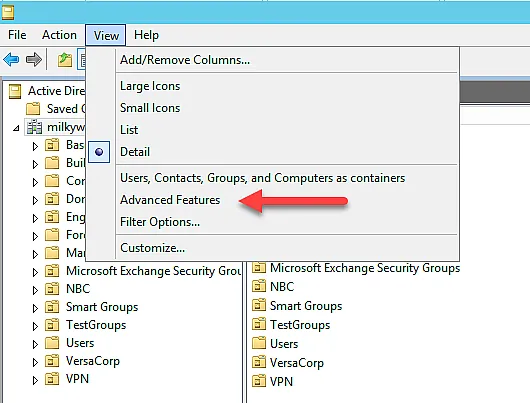
On enabling advanced features, you will also see more tabs in object properties, such as Object, Attribute Editor, Security, and Password Replication. Following is a comparison of the normal view with the advanced view:

Protect Objects from Accidental Deletion
As discussed in the previous section, ADUC Advanced settings enable you to add more tabs in an object’s properties window. In the Object tab, you have the feature of preventing accidental deletion; the object cannot be deleted as a result of this operation and attempting to do so results in an error message.
The following steps demonstrate how to prevent unintentional deletion of AD objects:
- In the ADUC left pane, right-click the object you want to keep from being accidentally deleted and select Properties.
- Select the Protect Object from Accidental Deletion check box on the Object tab.

- Select the Protect Object from Accidental Deletion check box on the Object tab.
The Object tab also shows the full path of the object, which helps to locate the object in the whole domain, along with some other attributes’ values.
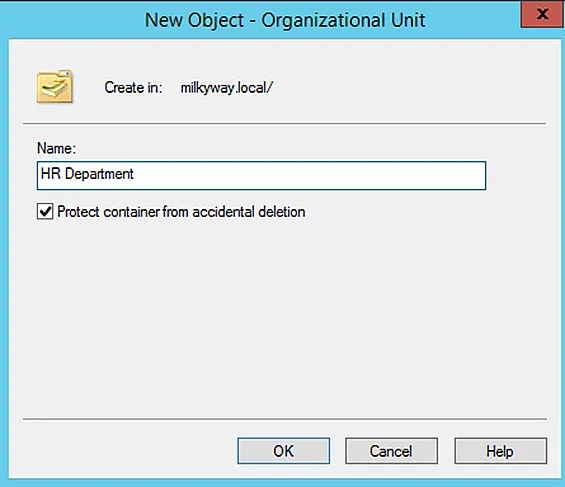
Create an OU
Creating objects using ADUC is rather easy; sometimes it involves one window and sometimes a wizard of two or three pages.
Follow these steps to create an organizational unit:
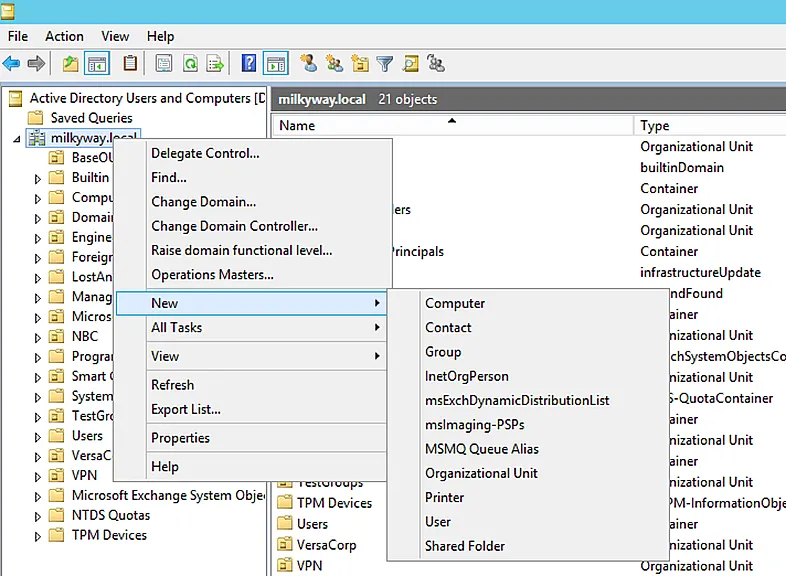
- Right-click the domain or the OU under which you want to create the desired OU; then click New > Organizational Unit.
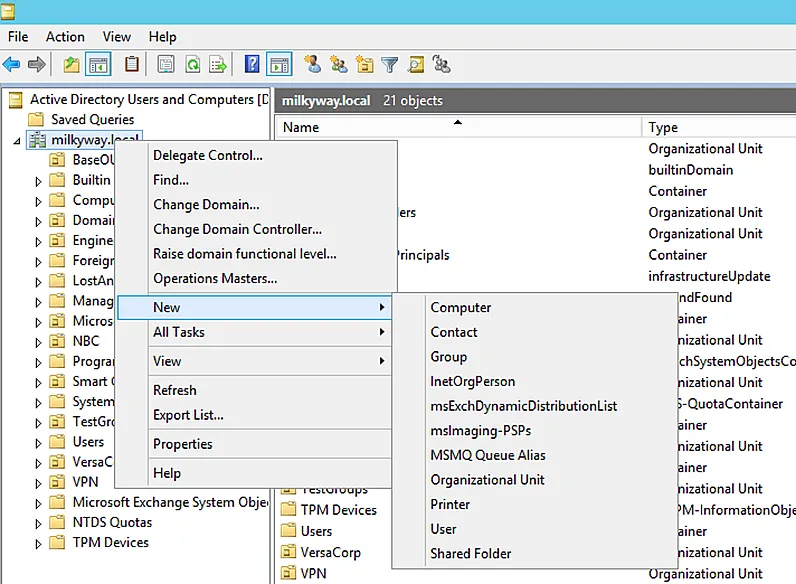
- Type a name for the new OU in the Name field and click OK; the organizational unit is created under the desired tree.
- For organizational units, you already have the option to prevent accidental deletion selected
Create a User Object
To create a user object using ADUC, follow these steps:
- Right-click the domain or the OU under which you want to create the user object; then click New > User.
- In the New Object – User dialog box, type the first name, last name, user logon name, and Pre-Windows user logon name. Click Next.

- On the next page, provide a strong password for new user.
- You also have the following four options to choose from:
- User must change password at next logon
- User cannot change password
- Password never expires
- Or Account is disabled

- Click Next to create the user.
Enable/Disable User Accounts
You can easily disable or enable a user account using the context menu in ADUC.
To disable a user account:
- Right-click the user object you want to disable and click Disable Account.

To enable a user account:
- Right-click a disabled user and click Enable Account.

Create a Group Object
Follow these steps to create a group using ADUC:
- Right-click the domain or the OU under which you want to create the new group.
- On the New Object – Group dialog box, type a name and a Pre-Windows name for the group.
- Select the group type as Distribution or Security.
- Select the group scope as domain local, global or universal.
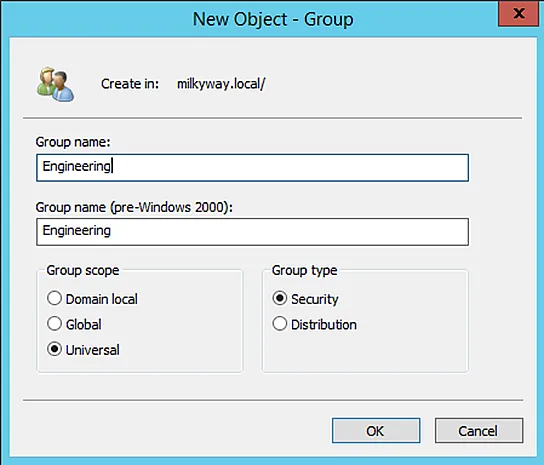
- Click OK to create the group.
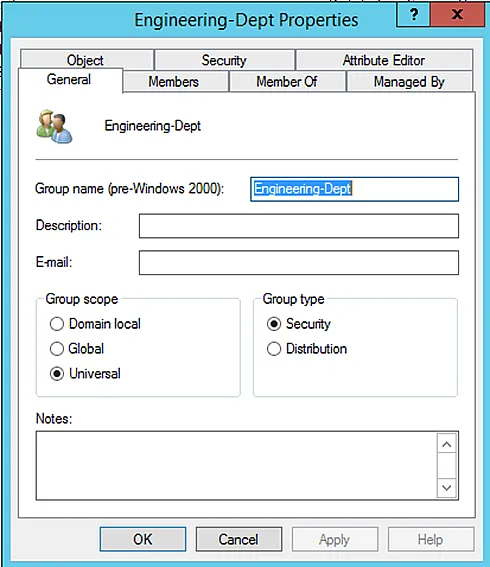
Change Group Type and Scope
As shown in the previous section, you must select a group type and scope while creating a group. But what if you want to change group type or scope after you have created the group, or for any other existing group, you can do that from the General tab of the group properties.
- Right-click the desired group and select Properties.

- On the General tab, you have the options to change the group type and scope.
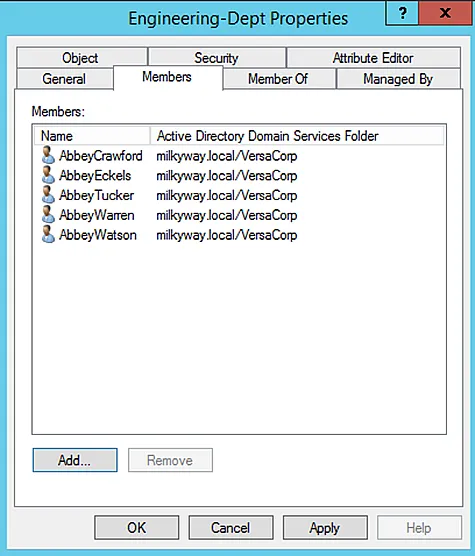
Add Members to a Group
ADUC enables you to add user objects to a group in many ways, such as:
- Find the group and open its properties. Then add members.
- Right-click the user object and select “Add to Group”; then select a group.
Follow are the steps to add users to a group:
- Right-click the group you want to add the users to, and select Properties.
- On the Members tab, click Add.
- On the Select Users, Contacts, Computers, Service Accounts or Groups window, you can also define the object type and scope, i.e., either full domain or a desired OU, by using the “Object Types” and “Location” option buttons.
- To add a user as member, type the user name in the “Enter the object names to select” box. Then click “Check Names”.
- If you type the correct name, the user object appears in the same box. If you type only the first name or part of the name, the “Multiple Objects Found” box will appear with matching results. Select the users you want to add to the group as members.
- Click OK to select the objects, then click OK to close the Select Users, Contacts, Computers, Service Accounts or Groups window.
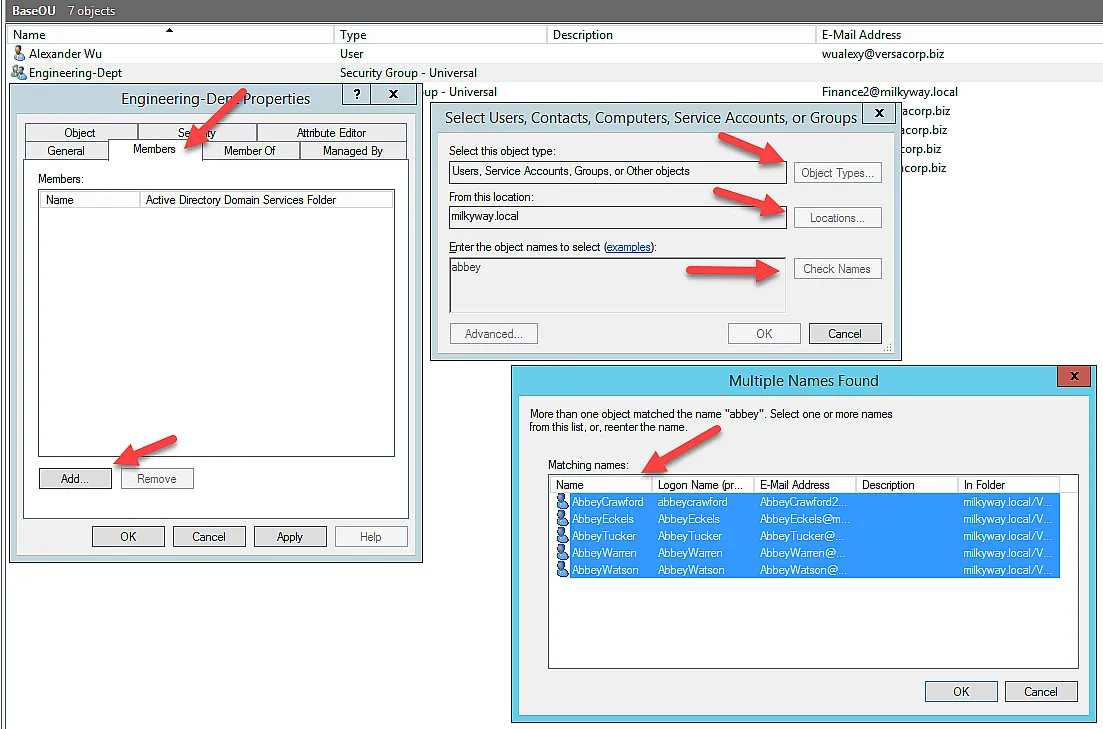
- Click Apply to save the changes. Click OK to close the group properties.
Create a Computer Account
Follow these steps to create a computer account using ADUC.
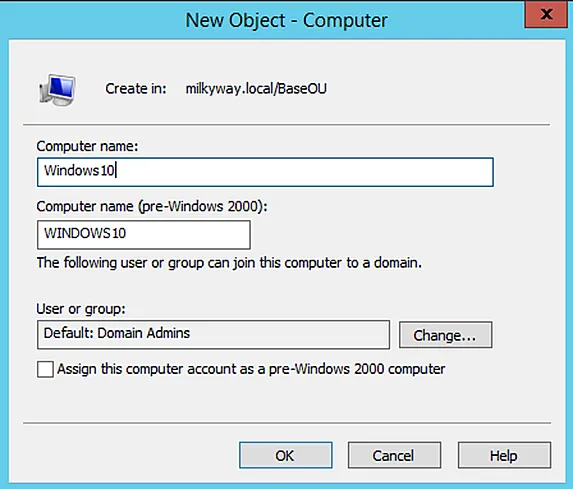
- Right-click the domain or the OU under which you want to create a new computer account; then click New > Computer.
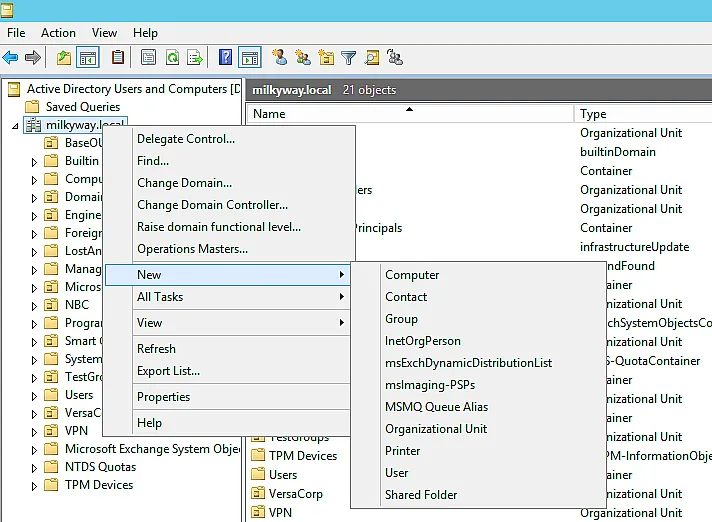
- On the New Object – Computer dialog box, provide a computer name as well as another name for pre-Windows environments.
- Specify a user or group to assign the management rights for this new computer. By default, the Domain Admins group is selected, so all the domain admins can manage the computer and can join it to the domain. You can specify a different group or user to give them rights over this computer object.
- You also have the option to assign this computer account as a pre-Windows 2000 computer.
- Click OK to create the computer account.
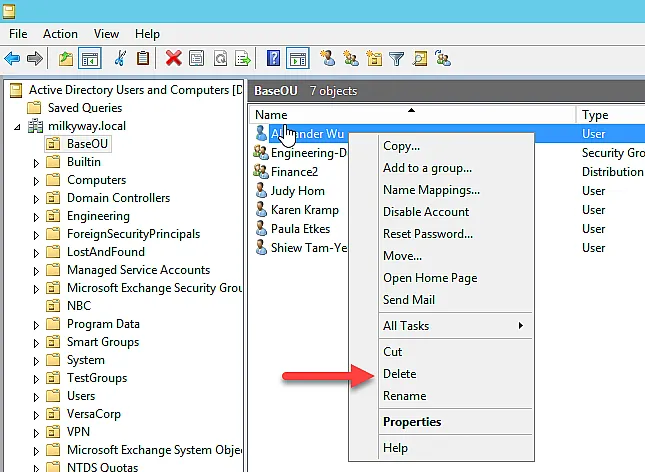
Delete Users, Groups and OUs
Deleting an object, such as a user, group, or an OU, is rather easy using ADUC. You just need to right-click the desired object and select the “Delete” option. A warning message will appear; click Yes to confirm.
Search Objects
ADUC provides a powerful feature of searching objects in the entire directory. You can find users, contacts, groups and OUs using the Find dialog box.
Follow these steps to search for an object.
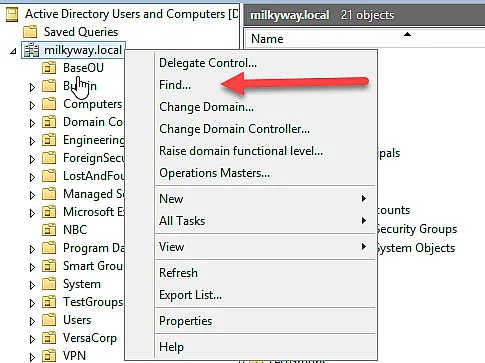
- Right click the domain or an OU and click “Find…”.
- In the Find dialog box, you will see the object types drop-down to select from.
- Select a domain or Entire Directory using the second drop-down.
- Use the Browse button to select a single OU to narrow down your search.
- Type the full name or first name of the user, or the name of the group you want to search.
- Click Find Now.

- The Search result box will appear, where you can see the search results.
- You can also double-click an object in search results to view its properties.

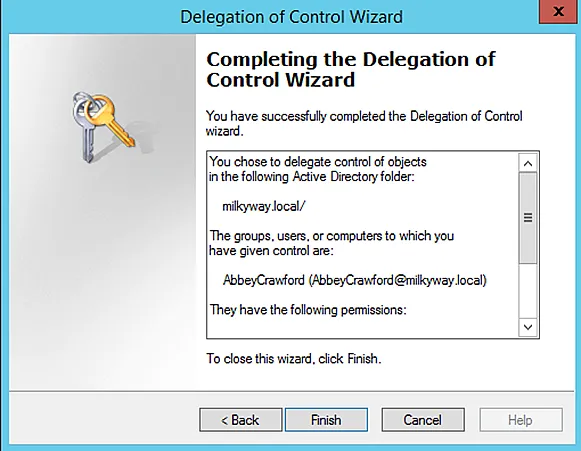
Delegate Control to Users Using ADUC
Using the Active Directory Delegation wizard, you can grant access and permission to a user or group for performing specific tasks, such as creating and managing user and group objects, managing specific domain controllers, etc.
The following steps show how you can grant permissions to a specific user object on the domain or an OU.
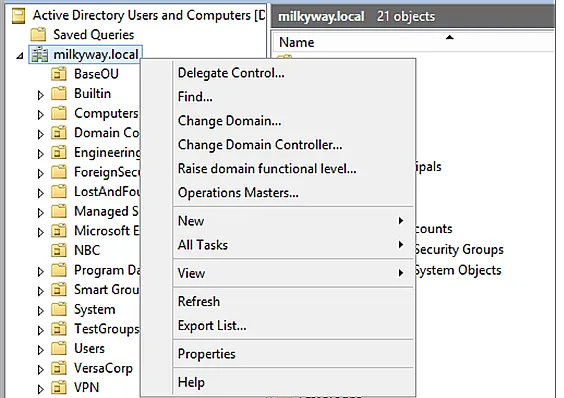
- Right-click the domain or the OU on which you want to assign permissions to an object. Click “Delegate Control…” to launch the wizard.

- The Welcome page guides you on what you can do with this wizard. Click Next.
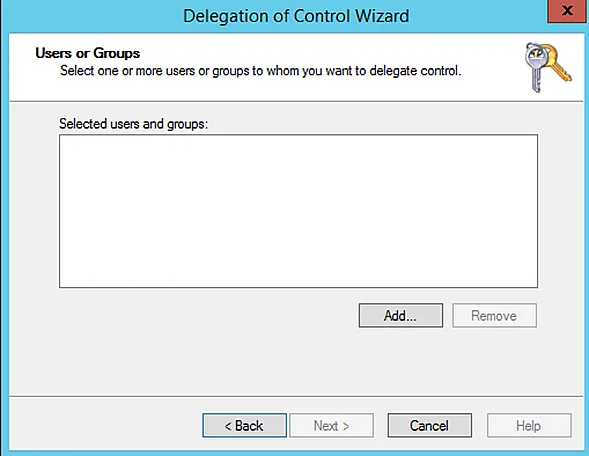
- On the next page, search for the user or group object you want to apply permissions on. For that, click Add.
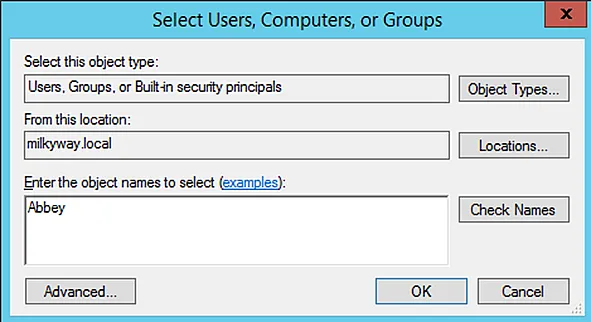
- In the “Select Users, Computers, or Groups” dialog box, type the name of the object and click “Check Names..”. You will be presented with the exact object or a number of object suggestions if you type an alias or keyword belonging to the object.
- You now see the object in the Selected users and groups field. Click Next.

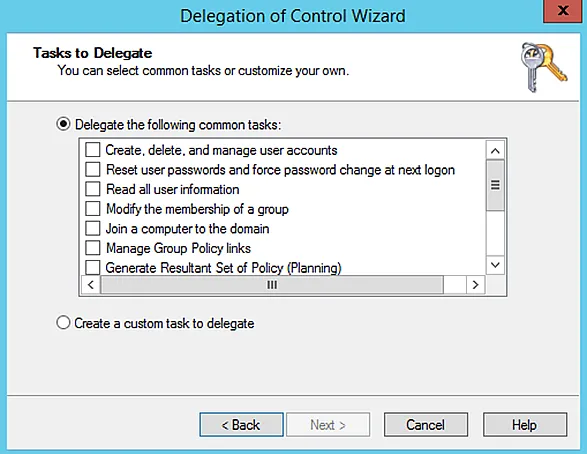
- On the next page, select the common tasks to be assigned to that specific user or group by choosing “Delegate the following common tasks”. You also have the option to assign a custom task by choosing “Create a custom task to delegate”. Click Next.
- On the next page, you can select “This folder, existing objects in this folder, and creation of new objects in this folder”, which will grant all the permissions to the object on the specific folder or OU.You can also assign custom object permissions by selecting “Only the following objects in the folder”. On selecting it, the other two checkboxes will be available for the creation and deletion of the selected objects in this folder.

- When you are done with object selection for the specific user or group object for permissions, the next page will allow you to select the level of permissions, e.g., Full Control, Read, Write, etc. Click Next after selecting the desired permissions.

- The last page of the wizard will show a summary of the tasks you have selected. Click Finish after verifying the details.
Create and Save Queries
You can build complex LDAP queries using the Saved Queries feature in the ADUC console. You can also save these queries to other computers and edit them as required. You can use the saved Active Directory queries to:
- Quickly and effectively find AD objects.
- Swiftly complete routine AD object management activities, like selecting all employees of a company with mailboxes on a specific Exchange server or displaying a list of all disabled accounts in a domain.
- Conduct group activities with objects from various Active Directory OUs.
- Under AD objects/accounts, for instance, you can do bulk lock/unlock, enable/disable, move, remove, and rename activities.
- Bypass Active Directory’s OU hierarchy and gather all the required objects in a flat table view.
The following steps show how to create a query for an operation.
- Right-click the domain or an OU under which you want to perform the search operation.
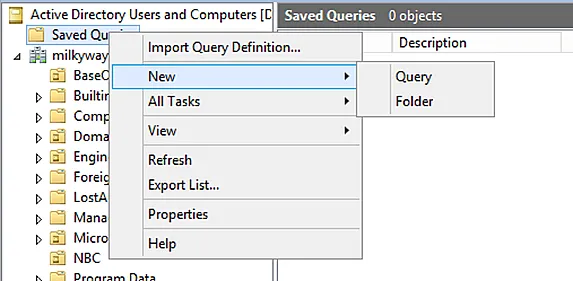
- Provide a name and description for the query. Click Browse to select another OU if required. Click Define Query to open another dialog box for defining the query.

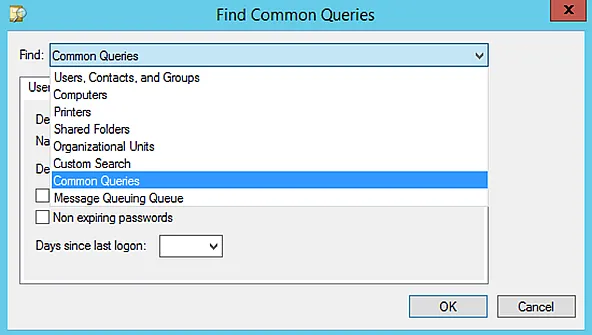
- In the Find Common Queries box, you have multiple options to choose from, for example:
- Users, Contacts, and Groups
- Computers
- Printers
- Shared Folders
- Organizational Units
- Custom Search
- Common Queries
- You have multiple objects to find, e.g., Users, Computers or Groups. You further have options for:
- Disabled accounts
- Non-expiring passwords
- Days since the user last logged on to the domain

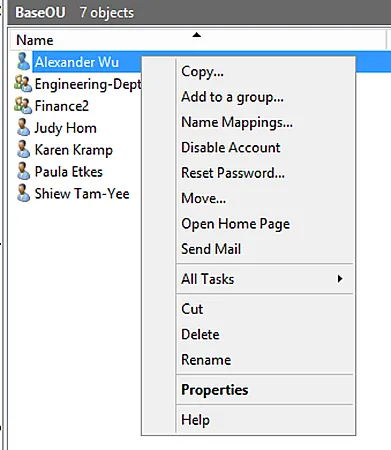
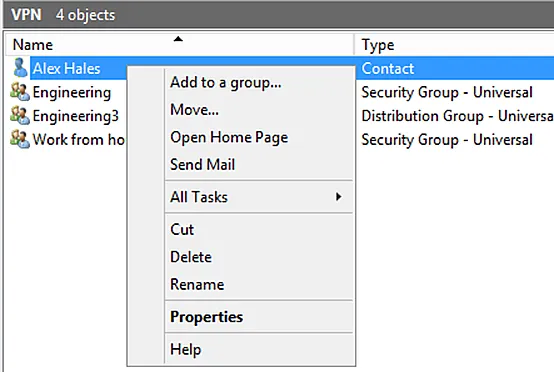
Other Options on the Context Menu
The context menu in ADUC appears when you click an object or click in the middle pane in an empty space. This menu displays common commands/options to choose from, which will be applied to the object you have selected.
- Following is an example of the context menu when you right-click the domain:
- Below you can see the context menu when you right-click an OU:

- Below is the context menu that appears when you right-click a user object:
- Below is the context menu that appears when you right-click a group object:

- Below is the context menu that appears when you right-click a computer object:

- Below is the context menu that appears when you right-click a contact object:
Jonathan Blackwell
View ProfileSince 2012, Jonathan Blackwell, an engineer and innovator, has provided engineering leadership that has put GroupID at the forefront of group and user management for Active Directory and Azure AD environments. His experience in development, marketing, and sales allows Jonathan to fully understand the Identity market and how buyers think.